
Cypress micro-frontend architecture on Azure Devops
Working on a micro frontend architecture usually means splitting up a monolithic site and its sections into different parts, where each part (or individual site) can be owned and worked on independently by different teams, each with their own product owner, stakeholders and autonomous release trains, and yes you guessed it - integration tests.
Going forward try to imagine a site where the /foo url is owned by team foo, the /bar url by team bar and global tests are owned by both.
In this post we're going to take a deep dive into setting up scheduled integration tests with Cypress and making everything run across multiple pipelines on Azure Devops.
Cypress repo - scaffolding
The project scaffolding for supporting multiple sites is easy, just think of it as a bunch of test commands pointing to different folders like /integration/foo and /integration/bar.
This way each site and team could have their own root folder housing all their tests.
{
  "test:all": "cross-env cypress run",
  "test:foo": "cross-env cypress run --spec './cypress/integration/foo/*'",
  "test:bar": "cross-env cypress run --spec './cypress/integration/bar/*'"
}
{
"test:all": "cross-env cypress run",
"test:foo": "cross-env cypress run --spec './cypress/integration/foo/*'",
"test:bar": "cross-env cypress run --spec './cypress/integration/bar/*'"
}Folder structure
├── integration
│   ├── global
│   │   └── foobar.spec.js
│   ├── foo
│   │   ├── foo.visuals.spec.js
│   │   ├── foo.interactions.spec.js
│   ├── bar
│   │   ├── bar.visuals.spec.js
│   │   ├── bar.interactions.spec.js
├── src
│   ├── Settings
│   │   └── index.js
├── support
│   ├── commands.js
│   └── index.js
├── integration
│ ├── global
│ │ └── foobar.spec.js
│ ├── foo
│ │ ├── foo.visuals.spec.js
│ │ ├── foo.interactions.spec.js
│ ├── bar
│ │ ├── bar.visuals.spec.js
│ │ ├── bar.interactions.spec.js
├── src
│ ├── Settings
│ │ └── index.js
├── support
│ ├── commands.js
│ └── index.js
Handling global settings
For DX, it's important to setup a file that knows about global things like settings and environment variables.
Create a file somewhere in your project and link to it in your Cypress support file
// support / index.js
import "../src/settings";
// support / index.js
import "../src/settings";This is how this settings file could look like:
// src / settings / index.js
const settings = {
  foo: Cypress.env("foo"),
  bar: Cypress.env("bar"),
  randomSetting: 3000,
};
cy.settings = settings;

// cy.settings is available everywhere from now on
// src / settings / index.js
const settings = {
foo: Cypress.env("foo"),
bar: Cypress.env("bar"),
randomSetting: 3000,
};
cy.settings = settings;
// cy.settings is available everywhere from now onCypress looks for a local cypress.env.json file if it cannot find the specified environment variables
{
  "foo": "https://sample-site-qa.com/foo",
  "bar": "https://sample-site-qa.com/bar"
}
{
"foo": "https://sample-site-qa.com/foo",
"bar": "https://sample-site-qa.com/bar"
}A sample test utilizing cy.settings:
context('Foo', () => {
  before(() => {
    cy.visit(cy.settings.foo);
  });

  describe('something', () => {
    it('does something successfully', () => {
      // ...
    })
  })
context('Foo', () => {
before(() => {
cy.visit(cy.settings.foo);
});
describe('something', () => {
it('does something successfully', () => {
// ...
})
})
Main test build pipeline in Azure - YAML
Step 1 - booting up:
Let's look at the main test pipeline. First of, we set it up to trigger when our master branch changes. Then after requiring NPM we specify that we want to pull in a variables group for QA (more about that further down).
trigger:
  - master

pool:
  vmImage: "ubuntu-latest"
  demands: npm

variables:
  - group: "site-qa"
trigger:
- master
pool:
vmImage: "ubuntu-latest"
demands: npm
variables:
- group: "site-qa"Step 2 - scheduling:
Next, we setup a scheduled 45 minute cycle cron job and install the dependencies specified in the package-lock.
The order of the cron syntax goes like this:
- minutes
- hours
- days
- months
- days of week
schedules:
  - cron: "*/45 * * * *"
    displayName: "Run once every 45 minutes"
    branches:
      include:
        - master
    always: "true"

steps:
  - task: Npm@1
    displayName: "Npm CI"
    inputs:
      command: "custom"
      workingDir: cypress
      verbose: true
      customCommand: "ci"

  - task: Npm@1
    displayName: "Npm clean"
    inputs:
      command: "custom"
      workingDir: cypress
      customCommand: "run clean"
schedules:
- cron: "*/45 * * * *"
displayName: "Run once every 45 minutes"
branches:
include:
- master
always: "true"
steps:
- task: Npm@1
displayName: "Npm CI"
inputs:
command: "custom"
workingDir: cypress
verbose: true
customCommand: "ci"
- task: Npm@1
displayName: "Npm clean"
inputs:
command: "custom"
workingDir: cypress
customCommand: "run clean"Step 3 - environment variables:
In this step we use a script block to grab all variables available within the variable group we imported in step 1 and pass them along to Cypress by prefixing them with CYPRESS_
(doing so makes them available to us within our tests)
Then we run all of our tests, meaning every .spec file that Cypress finds.
The reason to why we want to run all of our tests and not site specific tests is that we want the outcome of running all of our tests to be the predicate for if we publish an artifact or not.
- script: |
    set CYPRESS_foo=$(foo)
    set CYPRESS_bar=$(bar)
  failOnStderr: true
  workingDirectory: cypress
  displayName: "Set Cypress env variables"

- task: Npm@1
  displayName: "Npm run test:all"
  inputs:
    command: "custom"
    workingDir: cypress
    customCommand: "run test:all"
- script: |
set CYPRESS_foo=$(foo)
set CYPRESS_bar=$(bar)
failOnStderr: true
workingDirectory: cypress
displayName: "Set Cypress env variables"
- task: Npm@1
displayName: "Npm run test:all"
inputs:
command: "custom"
workingDir: cypress
customCommand: "run test:all"Step 4 - publish results and videos
After running our tests we make sure to publish the test results and the captured videos regardless if the test pass or fail.
- task: PublishTestResults@2
  displayName: "Publish Test Results **/test-result-*.xml"
  condition: succeededOrFailed()
  inputs:
    searchFolder: "$(System.DefaultWorkingDirectory)"
    testResultsFormat: "JUnit"
    testResultsFiles: "**/test-result-*.xml"
    failTaskOnFailedTests: false

- task: CopyFiles@2
  displayName: "Copy videos"
  inputs:
    SourceFolder: cypress/videos
    TargetFolder: "$(build.artifactstagingdirectory)"
  condition: succeededOrFailed()
- task: PublishTestResults@2
displayName: "Publish Test Results **/test-result-*.xml"
condition: succeededOrFailed()
inputs:
searchFolder: "$(System.DefaultWorkingDirectory)"
testResultsFormat: "JUnit"
testResultsFiles: "**/test-result-*.xml"
failTaskOnFailedTests: false
- task: CopyFiles@2
displayName: "Copy videos"
inputs:
SourceFolder: cypress/videos
TargetFolder: "$(build.artifactstagingdirectory)"
condition: succeededOrFailed()Step 5 - archiving and publishing main artifact
Lastly, we publish the main artifict given all test pass.
- task: ArchiveFiles@2
  displayName: "Zip artifact"
  inputs:
    rootFolderOrFile: "$(Build.SourcesDirectory)"
    includeRootFolder: false
    archiveFile: "$(Build.ArtifactStagingDirectory)/Cypress.zip"

- task: PublishBuildArtifacts@1
  displayName: "Publish Artifact: cypress-drop"
  inputs:
    PathtoPublish: "$(Build.ArtifactStagingDirectory)"
    ArtifactName: "cypress-drop"
    publishLocation: "Container"
- task: ArchiveFiles@2
displayName: "Zip artifact"
inputs:
rootFolderOrFile: "$(Build.SourcesDirectory)"
includeRootFolder: false
archiveFile: "$(Build.ArtifactStagingDirectory)/Cypress.zip"
- task: PublishBuildArtifacts@1
displayName: "Publish Artifact: cypress-drop"
inputs:
PathtoPublish: "$(Build.ArtifactStagingDirectory)"
ArtifactName: "cypress-drop"
publishLocation: "Container"Sample site build pipeline for foo / bar
This is how the testing phase of one of our micro sites could look:
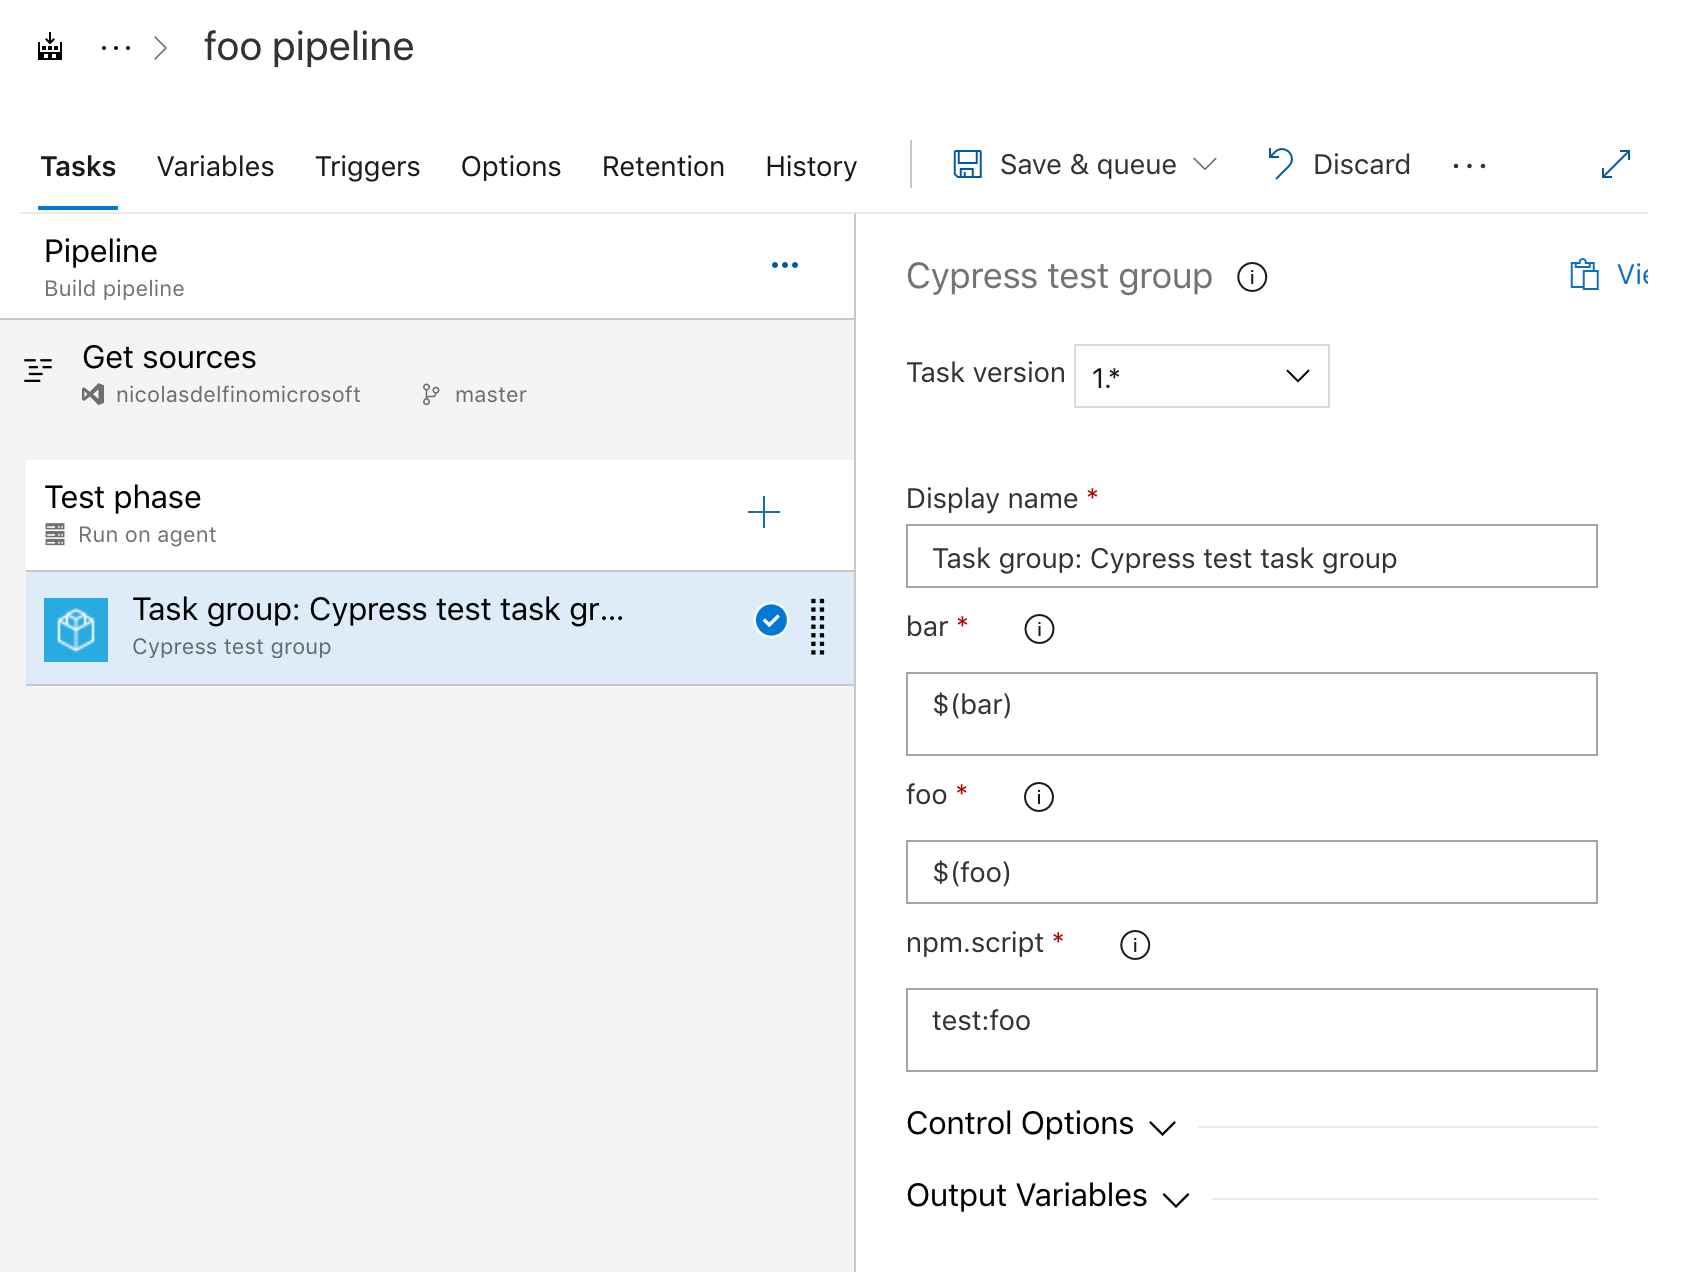
This phase would typically be after the deployment phase so that the tests are run on the live environment.
As you see on the image, we're using an Azure task group since the only thing different between our test phase for our foo and bar pipelines are which tests we should run (notice the npm script)
Variable and task groups
Variable / task groups are great when you need to reuse functionality across multiple pipelines. Let's have a look at how both of these work.
Variable groups
You create a variable group under Pipelines -> Library -> Variable groups.
In our case we create two:
- site-qa
- site-prod
Remember our script phase in our YAML file? This is where the variables foo and bar are specified and given different values depending on the environment.

Task groups
A task group is a set of reusable commands, written in either GUI blocks or with YAML.
As I wrote earlier, the reason to why we need one of these is because we're going to have multiple pipelines and want to avoid writing the same thing over and over again. Right now we only have the foo and bar sites, but in the future this could scale into more sites.
Our task group will test one of our sites based on a dynamic argument, more specifically:
- Download and extract the latest artifact
- Run npm CI
- Run a specific test script (command line)
- Publish test results
The dynamic element to our test group is setup like this
set CYPRESS_foo=$(foo)
set CYPRESS_bar=$(bar)

npm run $(npm.script)
set CYPRESS_foo=$(foo)
set CYPRESS_bar=$(bar)
npm run $(npm.script)